Allocating more ram to FL Studio is one of the most popular queries for producer who use it as their music production suite. Producers who often work on big projects tend to utilize the full memory and run out of RAM early while producing which often leads to the DAW not responding or crashing or even freezing for a few moments.
The best way to allocate more RAM to FL Studio is to either utilize your hard drive as virtual memory or customize some settings for better memory management.
Allocating more ram to FL Studio will also provide you with opportunities to play with a lot of plugins and work directly on the project without bouncing your audio or using any other tricks. Once your RAM/Phyiscal memory is increased it gives you smooth workflow, better performance and a lot of other benefits.
Process to allocate more RAM to FL Studio –
Using your hard disk space as RAM is one of the cheapest way to increase memory. This memory acts as a virtual memory giving you the space and performance you want.
Step by step guide to increase virtual memory –
- Go to your computer, right-click on a blank area, and choose the “Properties” option as your first step.
- After arriving there, select “Advanced System Settings”
- By selecting it, a new window will open; there, select “Advanced Options.” Click the “Settings” button under the “Performance”
- When a new box appears, choose “Advanced Options,” then click “Change” when you see the choice for “Virtual Memory.”
- By doing so, a new window will emerge, allowing you to change the capacity of your drives by unchecking the box next to the option to “Automatically Manage Paging File Size for All Drives.”
- Set a minimum size of 3000 MB and a maximum size of 3000 MB or higher on your document drive, then click “OK” and “Set.”
- In order to save the changes, you must restart your computer.
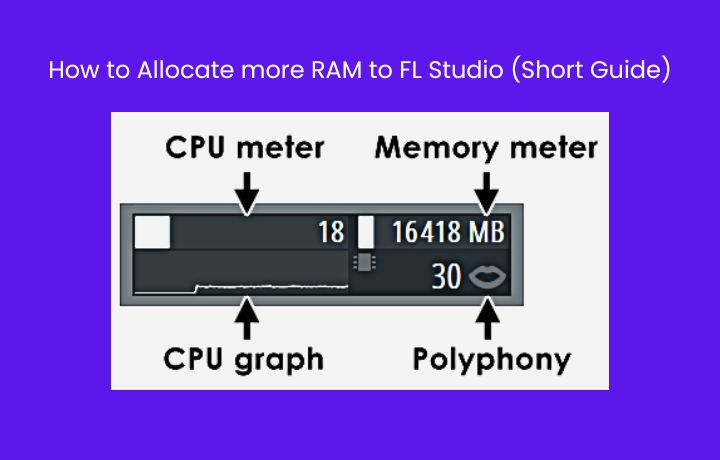
In FL Studio’s “Performance Options” panel, you may verify that you expanded the storage correctly by looking at the virtual memory description, where you will see that the capacity has increased.
Now that you have extra dedicated RAM, you can run FL Studio without any issues and start creating wonderful productions.